
Most adults assume a dazzling smile requires a dentist’s chair, a bright overhead light, and a bill that makes your eyes water. That assumption is costing people hundreds of dollars every year. The truth is that surface-level discoloration, which accounts for the vast majority of cosmetic whitening goals, can be addressed effectively at home with the right products and a little consistency. In this article, you’ll learn exactly why at-home whitening is so much cheaper, how the savings stack up over time, when it makes the most sense to use it, and how to avoid the common mistakes that waste both money and effort.
Table of Contents
- Why at-home whitening products help you save
- How much can you really save with at-home whitening?
- When at-home whitening delivers the best value
- Avoiding costly mistakes: Maximizing results and minimizing risk
- The real reason most adults overpay for whitening (and how to avoid it)
- SmileFam: Affordable, proven at-home whitening options
- Frequently asked questions
Key Takeaways
| Point | Details |
|---|---|
| At-home whitening means real savings | Over-the-counter kits can dramatically cut costs compared to dental visits while still brightening your smile. |
| Choose the right product | ADA-approved or dentist-recommended formulas balance effectiveness, safety, and value for most adults. |
| Follow instructions to avoid waste | Correct use not only protects your enamel but ensures each dollar spent delivers the best possible results. |
| At-home best for mild stains | Surface stains respond best to at-home options, while deep or complex discoloration may require a dentist. |
| Not for restorations | Whitening products don’t work on crowns, veneers, or fillings—save your money by focusing on your natural teeth. |
Why at-home whitening products help you save
The financial gap between professional and at-home whitening isn’t accidental. It comes down to a fundamental shift in who is doing the work and what you’re actually paying for.
When you sit in a dental office for a whitening session, a significant portion of your bill covers clinician time, facility overhead, protective setup (like custom trays and gum barriers), and the use of high-concentration bleaching agents that require professional supervision. These are real costs, and they add up fast. At-home products, by contrast, shift that cost from the provider to the product itself. You’re buying the chemistry, not the appointment.
The chemistry behind whitening is well understood. Bleaching agents like hydrogen peroxide or carbamide peroxide penetrate the enamel surface and break apart stain molecules through an oxidation reaction. The same basic mechanism applies whether the product is delivered in a dental office or through an over-the-counter strip. The key difference is concentration and delivery method, not the underlying science.
At-home formats have expanded significantly, giving consumers real choices based on budget and lifestyle:
- Whitening strips: Thin, flexible strips coated with a peroxide gel; typically the most popular OTC option
- Whitening pens: Precise, portable applicators ideal for touch-ups and targeted stain removal
- LED whitening kits: Combine a gel with a light device to accelerate the whitening process
- Whitening toothpastes: Daily-use products that remove surface stains through mild abrasives or low-level peroxide; explore whitening toothpaste options for everyday maintenance
- Custom trays: Boil-and-bite or dentist-provided trays with gel, offering a middle ground between strips and professional care
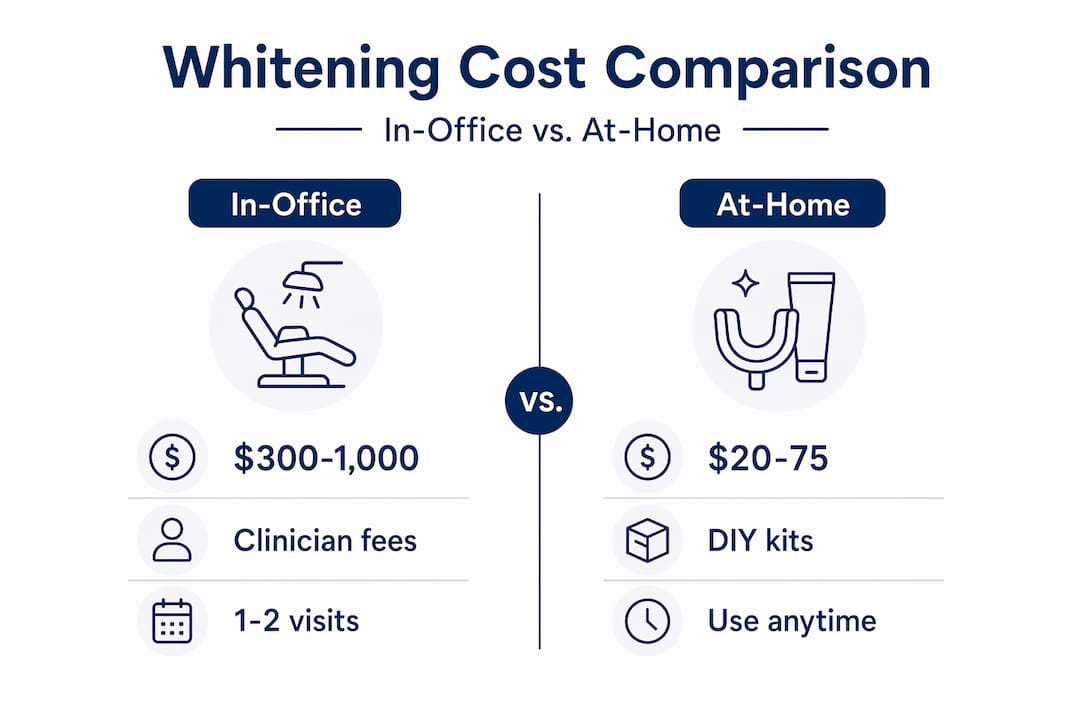
The biggest savings come from two places: avoiding repeated dentist appointments and eliminating the need for frequent professional touch-ups. A single in-office session can run anywhere from $300 to $1,000. Most people need more than one session to reach their goal, and results fade over time, meaning the costs compound quickly.
Statistic callout: ADA-approved at-home whitening products, including peroxide-based strips, are widely recognized as a safer and more affordable alternative to clinician whitening when used correctly.
Pro Tip: Always look for the ADA Seal of Acceptance when choosing a whitening product. It signals that the formula has been evaluated for both safety and effectiveness, which means you’re spending your money on something that actually works.
| Feature | In-office whitening | At-home whitening |
|---|---|---|
| Average cost per session | $300 to $1,000 | $20 to $100 |
| Time required | 60 to 90 minutes | 10 to 60 minutes daily |
| Concentration of agent | High (supervised) | Low to moderate (OTC-safe) |
| Best for | Severe or intrinsic stains | Mild to moderate surface stains |
| Frequency of touch-ups | Every 6 to 12 months | As needed, low cost |
How much can you really save with at-home whitening?
Knowing the cost drivers is useful, but the real motivation comes when you see actual dollar amounts side by side.
Let’s say you want to maintain a noticeably brighter smile for a full year. Here’s how the numbers typically break down:
| Product type | Cost per use/session | Annual cost estimate |
|---|---|---|
| In-office professional whitening | $300 to $1,000 per session | $600 to $2,000 (2 sessions + touch-ups) |
| Whitening strips (OTC) | $30 to $50 per kit | $90 to $150 (3 kits per year) |
| Whitening pen | $15 to $40 per pen | $60 to $120 (maintenance use) |
| Whitening toothpaste | $8 to $20 per tube | $48 to $120 (6 tubes per year) |
| At-home LED kit | $50 to $100 one-time | $50 to $100 (plus gel refills) |
The math is striking. A year of professional whitening, including the initial treatment and two touch-up sessions, can cost $600 to $2,000 or more. A year of consistent at-home whitening using a combination of strips, a pen for touch-ups, and a daily whitening toothpaste might run $150 to $300 total.
“The biggest savings mechanism is usually avoided appointment cost plus avoided repeated professional sessions for touch-ups; at-home solutions shift the cost from clinician time to consumer products and allow lower-cost maintenance.”
That’s a potential savings of $500 to $1,700 per year, just by making a smarter product choice for the right type of staining.
Here’s how to maximize those savings without sacrificing results:
- Start with a solid base kit. A teeth whitening kit that includes both a gel and application tools gives you the most flexibility for initial treatment.
- Use a whitening toothpaste daily. It maintains your results between treatments without adding significant cost.
- Reserve the pen for touch-ups. After an initial whitening session, a pen is all you need to address spot staining from coffee or tea.
- Buy bundles when available. A whitening bundle typically offers a lower per-unit cost than buying each product separately.
- Avoid overuse. Using products more often than directed doesn’t speed up results and wastes product, which defeats the purpose of saving money.
When at-home whitening delivers the best value
Not every whitening situation is the same, and understanding when at-home products are the right call is what separates smart spenders from frustrated ones.
At-home whitening delivers its best return on investment for people dealing with mild to moderate extrinsic stains. These are the surface-level discolorations caused by everyday habits like drinking coffee, tea, or red wine, eating deeply pigmented foods, or smoking. This type of staining responds well to peroxide-based chemistry and doesn’t require the high concentrations that only a dental office can safely provide.
At-home bleaching products have been shown in comparative studies to achieve meaningful whitening results, with differences between products depending more on formulation, safety profile, and time required than on dramatic differences in overall effectiveness. That’s genuinely good news for budget-conscious consumers.
At-home whitening is a strong fit if you:
- Have surface stains from food, beverages, or tobacco
- Want gradual, natural-looking improvement rather than an overnight transformation
- Are maintaining results after a previous professional treatment
- Have a consistent daily routine that makes product use easy to stick with
- Are looking for a cost-effective long-term solution rather than a one-time fix
However, at-home whitening is not the right tool for every situation. Consider seeing a dentist instead if you:
- Have intrinsic stains (discoloration that originates inside the tooth, often from medication or trauma)
- Have dental restorations like crowns, veneers, or composite fillings (whitening agents don’t affect these materials)
- Experience persistent or severe tooth sensitivity
- Have untreated cavities or gum disease that needs to be addressed first
For surface stains, a whitening pen is one of the most cost-effective tools available because it lets you target exactly where you need it without wasting gel on areas that don’t need treatment. If you’re curious about how your current staining compares to your whitening goals, SmileFam’s AI whitening tool can help you visualize realistic results before you commit to a product.
Pro Tip: Read the instructions before you open the package, not after. Knowing the correct wear time and application method before you start prevents the most common and costly mistakes.
Avoiding costly mistakes: Maximizing results and minimizing risk
Getting the most out of at-home whitening isn’t just about picking the right product. It’s about using it correctly every single time. Misuse is the number one reason people feel like at-home whitening “doesn’t work,” and it’s also the fastest way to turn a money-saving strategy into an expensive problem.
Common mistakes that waste product and money:
- Applying gel and then eating or drinking immediately, which dilutes the formula before it can work
- Leaving strips or trays on longer than directed, assuming more time equals better results
- Letting gel contact the gums, which causes irritation and doesn’t improve whitening
- Skipping days and then doubling up to “catch up,” which disrupts the process and increases sensitivity risk
- Using whitening products on teeth with untreated decay or gum issues
Here’s a straightforward approach to safe, effective whitening that protects your investment:
- Brush and dry your teeth before applying any whitening product. A clean, dry surface allows the gel to adhere properly and work more effectively.
- Follow the recommended wear time exactly. If the package says 30 minutes, set a timer. Overuse causes sensitivity and gum irritation without delivering faster results.
- Apply carefully to avoid gum contact. Trim strips if needed, or use a pen for more precise application.
- Space out your sessions as directed. Most kits are designed for use every day or every other day for a set number of weeks, not indefinitely.
- Use a sensitivity toothpaste between sessions if you notice any discomfort. This helps manage minor reactions without stopping your whitening routine entirely.
“Increased tooth sensitivity and gum irritation are the most common side effects when whitening products are used longer than recommended or when gel contacts the gums.”
If sensitivity becomes more than mild and temporary, stop using the product and consult a dentist. Pushing through significant discomfort doesn’t save money; it risks creating a more expensive problem down the road. Pairing your whitening routine with a quality electric toothbrush bundle can also support overall oral health, which makes whitening results last longer and reduces the need for frequent retreatment.
The real reason most adults overpay for whitening (and how to avoid it)
Here’s an opinion that might be uncomfortable: most adults who overpay for whitening don’t do it because they lack money. They do it because they lack information.
There’s a deeply ingrained belief that anything dental must be done by a dentist to be legitimate. That belief is understandable, given how much we’re taught to defer to professionals for health decisions. But it doesn’t hold up when you look at the evidence. The chemistry in over-the-counter whitening products is the same fundamental chemistry used in clinical settings. The difference is concentration and context, not quality or validity.
The real overpayment trap looks like this: a consumer sees a celebrity-endorsed whitening brand with aggressive marketing claims, pays a premium price, uses the product incorrectly, gets mediocre results, and then concludes that at-home whitening doesn’t work. They book a dental appointment. The cycle repeats.
The smarter path is boring but effective. Look for products with the ADA seal or clearly stated, lab-tested formulas. Read the instructions. Match the product to the type of staining you actually have. Don’t expect a whitening pen to fix deep intrinsic discoloration, and don’t spend $800 on an in-office treatment for a coffee stain that a $40 strip kit could handle.
Edge cases do exist. Whitening over dental restorations like crowns, veneers, or fillings won’t produce matching results because those materials don’t respond to bleaching agents. If you have a mix of natural teeth and restorations, professional guidance is genuinely worth the cost. Similarly, if sensitivity is persistent rather than mild and temporary, that’s a signal to stop and get a professional opinion.
“If you have crowns, veneers, or fillings, at-home whitening products will not change the color of those restorations, and results on surrounding natural teeth may create a visible mismatch.”
The bottom line is this: educated use of proven at-home tools, chosen based on your actual staining type and used exactly as directed, is how you get real results at a fraction of the cost. Explore affordable whitening solutions that match your specific needs rather than defaulting to the most expensive option by assumption.
SmileFam: Affordable, proven at-home whitening options
If you’re ready to put these strategies into practice, SmileFam makes it straightforward to find the right product for your goals and your budget.
SmileFam’s lineup is built around the idea that effective whitening shouldn’t require a dentist’s bill. Every product uses lab-approved, enamel-safe formulas designed for real results without harsh chemicals. Here’s why SmileFam is worth considering:
- Budget-friendly entry point: Start with the BLU Whitening Toothpaste for daily maintenance that won’t strain your wallet
- Complete treatment option: The Ultimate Whitening Bundle Kit gives you everything you need for a full whitening routine at a bundled price
- Precision on the go: The Snow Serum™ Whitening Pen is perfect for targeted touch-ups between sessions, using BLU Whitening Technology for fast, visible results
- Sensitive-gum safe: All formulas are designed to be gentle enough for daily use without irritation
Choose the product that fits where you are in your whitening journey, and start saving from day one.
Frequently asked questions
Are at-home whitening kits as effective as professional treatments?
At-home kits can be highly effective for mild to moderate surface stains, with formulation-dependent results that compare favorably to professional treatments for everyday discoloration. Complex or deep intrinsic staining may still require professional care.
Is at-home whitening safe if I have sensitive teeth?
Yes, but you need to follow instructions carefully and avoid overuse, since improper use increases sensitivity and gum irritation significantly. Choosing a formula specifically designed for sensitive teeth also helps minimize discomfort.
How long does at-home whitening usually take to show results?
Most people see visible improvement within one to two weeks of consistent use on mild to moderate stains. Results vary depending on the product type and the severity of the staining.
Do at-home whitening products work on crowns or veneers?
No. Whitening agents only affect natural tooth enamel, so restorations like crowns, veneers, and fillings will not change color and may end up visibly mismatched with your whitened natural teeth.