
A brighter smile is one of the most confidence-boosting changes you can make, and it does not have to cost you a fortune. A solid budget teeth whitening plan home strategy gives you real results without the price tag of professional dental visits. Professional in-office whitening runs $500 to $1,000 per session, while at-home options deliver comparable brightness for $20 to $150. This guide covers everything from choosing the right products to building a maintenance routine that keeps your smile bright for months, all without draining your wallet.
Table of Contents
- Key takeaways
- Understanding the basics of your budget whitening plan
- Preparing for safe and effective at-home whitening
- How to execute your step-by-step whitening routine
- Maintaining your results without spending more
- Common mistakes and when to get professional help
- My honest take on budget whitening
- Getsmilefam products that fit your whitening budget
- FAQ
Key takeaways
| Point | Details |
|---|---|
| Cost advantage is significant | At-home whitening costs a fraction of in-office treatments, with products ranging $20-$150. |
| Sensitivity shapes product choice | Matching peroxide concentration to your sensitivity level protects your enamel and comfort. |
| Consistency beats intensity | Gentle, frequent maintenance outperforms aggressive treatments that risk enamel damage. |
| Preparation matters | Clean teeth and a healthy oral baseline before you start maximize your whitening results. |
| Affordable tools work long-term | Whitening pens, strips, and toothpaste keep results going without repeating full treatment costs. |
Understanding the basics of your budget whitening plan
Before you spend a single dollar, knowing how whitening actually works saves you from wasting money on the wrong products. Most at-home whitening products rely on hydrogen peroxide and carbamide peroxide to penetrate enamel and break apart stain molecules. The concentration of those agents determines both the speed of results and the risk of sensitivity.
Here is the cost reality most people overlook:
- In-office whitening: $500 to $1,000 per session
- At-home whitening kits: $20 to $150 upfront
- Maintenance products (toothpaste, strips, pens): $10 to $50 per month
- Professional at-home kits with custom trays: $100 to $400, but deliver results close to in-office quality
The most affordable teeth whitening solutions come in several forms, each with different trade-offs:
| Method | Average Cost | Best For | Sensitivity Risk |
|---|---|---|---|
| Whitening strips | $20–$50 | Moderate staining, beginners | Low to moderate |
| Whitening pens | $15–$40 | Touch-ups, travel | Low |
| Gel trays (OTC) | $25–$60 | Even coverage | Moderate |
| Whitening toothpaste | $5–$15 | Daily maintenance | Very low |
| Custom tray kits | $100–$400 | Near-professional results | Moderate |
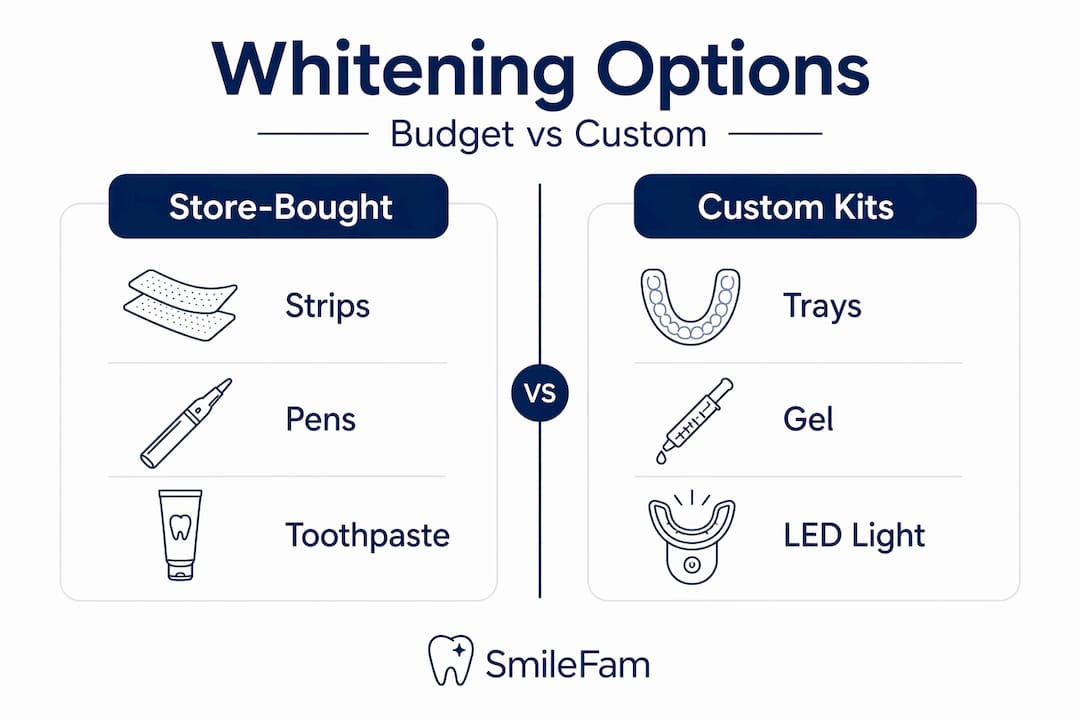
Professional at-home kits with custom trays deliver near-professional results at a fraction of the cost. For most people on a tight budget, starting with strips or a whitening pen and maintaining with toothpaste is the smartest approach. You get visible results without a massive upfront investment.
Pro Tip: Before comparing product prices, check the peroxide percentage on the label. Higher is not always better. A 10% concentration used consistently often outperforms a 22% concentration used incorrectly.
Preparing for safe and effective at-home whitening
Jumping straight into whitening without preparation is one of the most common mistakes people make. Getting your baseline right costs nothing and dramatically improves your results.
Start by doing a thorough professional or at-home cleaning. Whitening agents cannot penetrate plaque or tartar, so stained teeth covered in buildup will whiten unevenly. If you cannot afford a cleaning right now, focus on two weeks of careful brushing and flossing before starting any whitening treatment.
Next, honestly assess your tooth sensitivity. Dentists recommend peroxide concentrations between 10% and 15% for sensitive teeth, with treatment windows of 7 to 21 days depending on the product. If hot or cold drinks already cause you discomfort, start at the lower end and give yourself more days to reach your goal.
Here is what you need assembled before you begin:
- A whitening product suited to your sensitivity level (strips, gel tray, or pen)
- Whitening toothpaste for maintenance after your treatment cycle
- A soft-bristle toothbrush to reduce enamel abrasion
- Desensitizing toothpaste or gel on standby if sensitivity spikes
- A simple calendar to track your treatment days
One area where people waste money is on abrasive homemade remedies. Baking soda mixed with lemon juice sounds economical, but the acid erodes enamel and the abrasion causes long-term damage that costs far more to fix than any whitening kit. Natural options provide mild benefits at best and are not substitutes for peroxide-based products.
Pro Tip: Take a “before” photo under consistent lighting before your first treatment. Progress looks subtle day-to-day but dramatic when you compare week one to week three.
How to execute your step-by-step whitening routine
Consistency and patience are what separate people who get real results from those who give up halfway. At-home whitening is a process of gradual improvement, not an instant fix. Here is how to run a solid, economical teeth brightening routine from day one.
For whitening strips:
- Brush and dry your teeth lightly before applying. Moisture reduces adhesion.
- Apply the upper strip first, pressing firmly to fit the contour of your teeth.
- Fold any remaining strip material behind your teeth for better contact.
- Leave on for the time specified on the packaging (typically 20 to 30 minutes).
- Remove, rinse, and do not eat or drink anything colored for at least 30 minutes.
- Repeat daily for the treatment window, usually 7 to 14 days.
For whitening pens:
- Brush your teeth and dry them completely.
- Twist the pen base until gel appears at the tip.
- Apply a thin layer across each tooth using a smooth brushing motion.
- Hold your mouth open for 30 to 60 seconds to let the gel dry.
- Avoid eating, drinking, or rinsing for at least one hour after application.
- Use once or twice daily as directed, typically for 1 to 2 weeks.
For gel trays:
- Apply a small pea-sized amount of gel to each tooth compartment in the tray.
- Seat the tray firmly against your teeth.
- Wear for the time specified (usually 30 minutes to several hours depending on concentration).
- Remove, rinse the tray, and rinse your mouth thoroughly.
- Poor-fitting trays cause uneven whitening and gum irritation; strips are a smarter choice if your tray does not fit precisely.
Managing sensitivity during treatment: If sensitivity hits, skip a day. Do not push through pain. Sensitivity is your enamel signaling overload. Potassium nitrate and desensitizing gels reduce discomfort effectively. Apply a desensitizing toothpaste for 30 minutes before your next session to build tolerance before treating again.
Pro Tip: Do your whitening treatment at night. Enamel pores are slightly open after treatment, making teeth more vulnerable to restaining. Sleeping right after limits exposure to food and drink that would undo your work.
Maintaining your results without spending more
Finishing your initial treatment cycle is the starting line, not the finish line. The good news is that maintaining your results on a budget is far cheaper than the original whitening.
Here is how to lock in your brightness affordably:
- Switch to a whitening toothpaste as your everyday brush. It polishes away surface stains before they set in and extends the life of your treatment by weeks.
- Add a whitening mouthwash to your routine two to three times per week. It is not a treatment on its own, but it helps rinse away chromogens (the compounds in coffee, tea, and wine that stain teeth).
- Use a whitening pen for quick touch-ups after meals or coffee, especially in the first few weeks post-treatment.
- Avoid major staining foods and drinks for the first 48 hours after any whitening session. Coffee, red wine, tomato sauce, and dark berries are the biggest culprits.
- Schedule mini-treatment rounds every 3 to 4 months using strips or a pen. Gradual improvement combined with consistent maintenance beats sporadic intense sessions every time.
Rinsing your mouth with water immediately after drinking coffee or tea takes about 10 seconds and meaningfully reduces stain accumulation. It is one of the most underrated and completely free habits in any home whitening routine.
Pro Tip: Drink staining beverages through a straw. It sounds small, but it cuts direct tooth contact by a significant amount and is especially useful in the weeks right after treatment.
Common mistakes and when to get professional help
Even the best cheap at-home teeth whitening plan can go sideways if you make these common errors.
- Overusing your product: More applications do not mean faster results. Frequent mild maintenance preserves enamel health far better than aggressive overuse, which causes lasting damage.
- Ignoring sensitivity signals: Sensitivity is not a minor inconvenience. It is your body flagging early enamel stress. Skip a session, use desensitizing toothpaste, and do not return to treatment until you feel comfortable. Desensitizing agents and alternating treatment days are critical tools, not optional extras.
- Expecting whitening to fix intrinsic stains: At-home whitening addresses surface and near-surface stains from food, drinks, and tobacco. Stains from tetracycline antibiotics, trauma, or fluorosis sit inside the tooth structure. No amount of OTC product will shift those significantly.
- Skipping the dentist when things go wrong: Gum irritation that lasts more than 48 hours, white spots, or pain that does not resolve after stopping treatment all require professional attention. Trying to push through compounds the damage and ultimately costs more.
In-office treatment makes financial sense if you have severe discoloration, intrinsic staining, or a specific event on a fixed timeline. For general cosmetic improvement, though, the at-home whitening benefits are strong and the cost savings are real. Knowing which category your staining falls into is the most important decision you make before spending anything.
My honest take on budget whitening
I have watched a lot of people overcomplicate this. They spend two hours researching the “best” kit, then use it twice and quit because they expected their teeth to look bleached in three days. That is not how this works.
In my experience, the people who get consistently great results on a budget are not using the most expensive products. They are using medium-grade products with near-perfect consistency. They do not skip days. They do not rinse with wine an hour after treatment. They brush with a whitening toothpaste every single day and hit a touch-up pen every couple of weeks.
What I have learned is that gentle formulas actually serve budget-conscious users better in the long run. Reaching for a lower peroxide concentration means less sensitivity, which means you actually complete the full treatment cycle. Completing the cycle beats stopping halfway through a stronger product every time.
The bigger lesson is that teeth whitening on a budget is a routine, not an event. Think of it like skincare. Nobody expects their skin to transform after one moisturizer application. You build the habit, you manage sensitivity carefully, and you give the process the weeks it actually needs. Do that, and you will be genuinely surprised by what $30 and some patience can do.
— Lenney
Getsmilefam products that fit your whitening budget
If you are building a practical whitening routine and want products that are gentle, effective, and priced for real people, Getsmilefam has you covered.

The BLU Whitening Toothpaste is designed for daily maintenance, using Getsmilefam’s proprietary BLU Whitening Technology to lift surface stains without harsh hydrogen peroxide or abrasive chemicals. It fits naturally into any ongoing whitening plan as your everyday brush. For targeted touch-ups, the Snow Serum™ Whitening Pen gives you a quick, mess-free application that works between full treatment cycles. And if you are thinking long-term savings, the SmileFam Refiller Pack keeps your routine going at a lower per-use cost. These are not one-time purchases. They are the building blocks of a whitening habit that actually sticks.
FAQ
What is the cheapest effective way to whiten teeth at home?
Whitening strips and whitening pens are the most affordable teeth whitening solutions, typically ranging from $15 to $50. Pairing them with a whitening toothpaste for daily maintenance delivers the best results at the lowest ongoing cost.
How long does a budget at-home whitening plan take to work?
Most at-home whitening products show visible results within 7 to 14 days of consistent use. Gradual improvement is normal, and combining an initial treatment cycle with maintenance products extends results for months.
Is it safe to whiten teeth at home without a dentist?
Yes, for most people with surface staining. Choose products with 10% to 15% peroxide if you have sensitive teeth, follow the usage instructions exactly, and stop immediately if you experience lasting pain or gum irritation.
Can whitening toothpaste replace a full whitening treatment?
Whitening toothpaste maintains brightness and prevents new surface stains but does not replicate the deeper whitening of peroxide-based strips or gels. Use it as an ongoing companion to your treatment, not a substitute.
How often should you repeat an at-home whitening treatment?
Most dentists and product guidelines recommend repeating a full treatment cycle every 3 to 4 months. Frequent mild maintenance with a pen or whitening toothpaste between cycles reduces the need for repeated intensive treatments.